
Peplink MBX Overview
March 25, 2021
Installing a SIM Card in the HD1 Dome
April 6, 2021
Broadcast Layer2 VLAN over SpeedFusion Split Tunnel
In this tutorial, Peter from West Networks explains how to Broadcast Layer2 VLAN over SpeedFusion Split tunnel!

Create the VLAN:
- First, make sure all devices are in InControl and online.
- Menu: "Network Settings" > "VLAN Networks"
- Click "Add VLAN Network" on the left:
- Setting applied in video: Note: DHCP server can be selected as "disable" or "Unmanaged" Do not "enable" this will auto push VLAN settings and you will lose some control

- Go back to the Dashboard check that it is pushing the configurations.
(In the Device list, the "Last Config Applied" section to the right) - Go to your devices to make sure the Layer2 VLAN is working properly
(Under the device > Network > Network settings > VLAN10) - Next you will want to change the LAN IP Settings for each device:
- Looking at Peter's example: He has three devices (SDX, 310, HD2)
- He changes the IP Address to be sequential.
- First is the SDX:
He leaves the IP Address "172.16.10.1" and leaves DHCP "enable" checked - Second is the 310:
Changes IP Address "172.16.10.2" and Disables DHCP by un-checking the "enable" box (to avoid DHCP conflicts) - Third is the HD2: Changes IP Address to "172.16.10.3" and Disables DHCP by un-checking the "enable" box (to avoid DHCP conflicts)
- Save and Apply

Creating SpeedFusion with a sub tunnel:
- In the Menu "PepVPN / SpeedFusion" > "Configuration"
- Check the "Enabled" box under "PepVPN / SpeedFusion Configuration title
- "Add Profile" bottom left of the screen, under the map.
- "Star" profile, because we will have a lot of connections

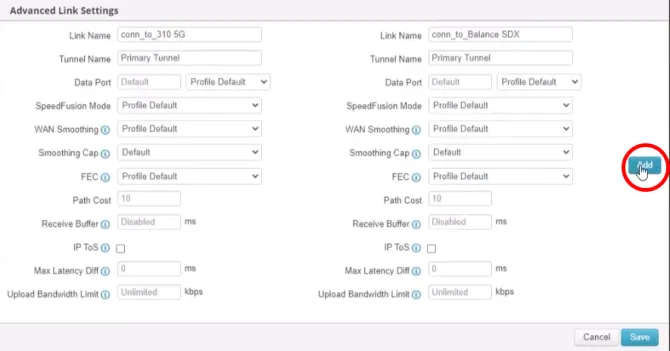
- In the new "Advanced Link Settings" window, find the "Tunnel Name" and rename it "VLAN10-L2". This will be your sub tunnel.
- Click "Save" then "OK"
- Edit the sub tunnel name for the next device: Find the next device on the list. in this case it is the "HD2 5G" device. Click "Edit" to the right.
- Click "Add" to add a new sub tunnel.
- Change the "Tunnel Name" to be the same as the first: "VLAN10-L2"
- Click "Save" then "Ok"
- Click "Save"
- Click "Next"
- Click "save Changes" this will be back in the "PepVPN / SpeedFusion" view

Setting up the Layer2:
-
SDX Device setup:
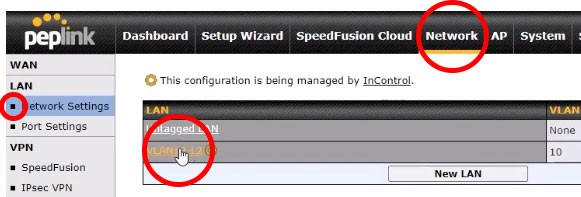
- Make sure you are back at main dashboard for your SDX. In the menu:
"Network" find "Network Settings" on the top left, click on "LLAN10-L2"
- Make sure you are back at main dashboard for your SDX. In the menu:

- Now we need to tell the Layer2 network to broadcast as a Layer2 over SpeedFusion. Under the "Network Settings" section, if you look to the right you will see a Question mark.
- Click the "Question Mark" then Click "here" in the pop-up.

- This will give you more options by adding a box titled "Layer2 PepVPN Bridging. in the first option select the 310 5G device.
- Click the "+"
-

- Select the HD2 device. It should look like this:

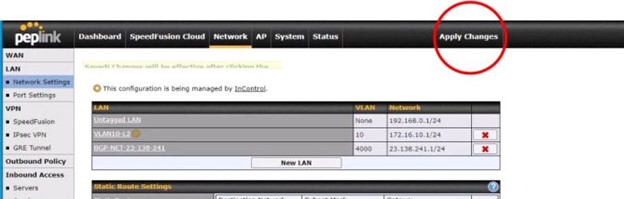
- Click "Save" at the bottom. This will close that pop-up
- Now Click "Apply Changes" at the top middle:
Setting up the 310 5G device:
- This will repeat a lot from the SDX, first go to the 310 Dashboard, then in the menu: "Network" find "Network Settings" to the left, then click "VLAN10-L2"
- Once there Click the "Question Mark" in the "Network Settings" section then click "here" link
- With the new options "Layer 2 PepVPN Bridging" available.
Add the SDX from the "Profile name" drop down. - Click "Save" this will close those options
- Click "Apply Changes" top bar middle
Setting up HD2 device:
- Make sure you are looking at the Dashboard of your HD2 5G device. Repeat steps above for "Setting up the 310 5g device"
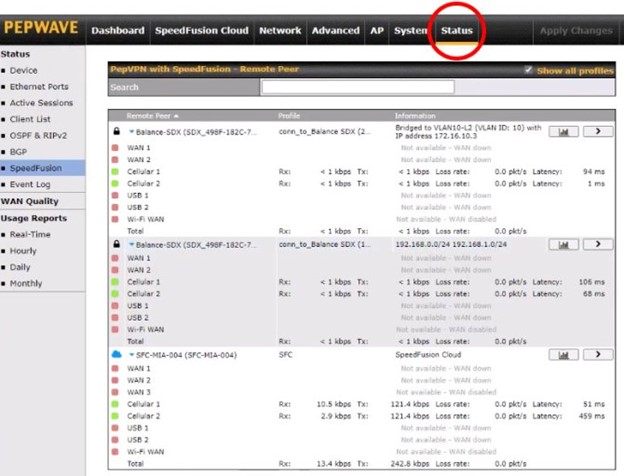
- Click "Status" tab in the top menu to view the status of the tunnel
Checking Status:
- Going to the 310 device Dashboard, click "Status" to check the status of the tunnel.
- Moving to the SDX Dashboard, you should see four Tunnels, 2 Tunnels to each router.
Telling the 310 Ports how to react:
- Go to the 310 5G Dashboard
- In the menu: "Network" then Click "Port Settings" to the left: This will give you control over your ports.

Related posts


June 20, 2025
